Introduction to Tying a Tie
Tying a tie is more than just a skill; it’s a rite of passage for many. Picture this: you’re about to attend an important event, maybe a job interview or a wedding, and you need to look your best. Knowing how to tie a tie can make a significant difference in your appearance and confidence. This guide will walk you through the various types of tie knots, their historical significance, and detailed steps to master each one. Whether you’re a beginner or looking to refine your technique, this guide has you covered.
Basic Types of Tie Knots
The Four-in-Hand Knot
The Four-in-Hand Knot is one of the simplest and most versatile knots. It’s perfect for any occasion and works well with most types of ties.
The Half Windsor Knot
The Half Windsor Knot offers a more symmetrical look than the Four-in-Hand. It’s ideal for medium-width and thick ties.
The Full Windsor Knot
The Full Windsor Knot is the go-to for formal events. It’s large, symmetrical, and exudes confidence.
The Pratt Knot
The Pratt Knot, also known as the Shelby Knot, is a middle-ground option. It offers a neat, balanced look suitable for most occasions.
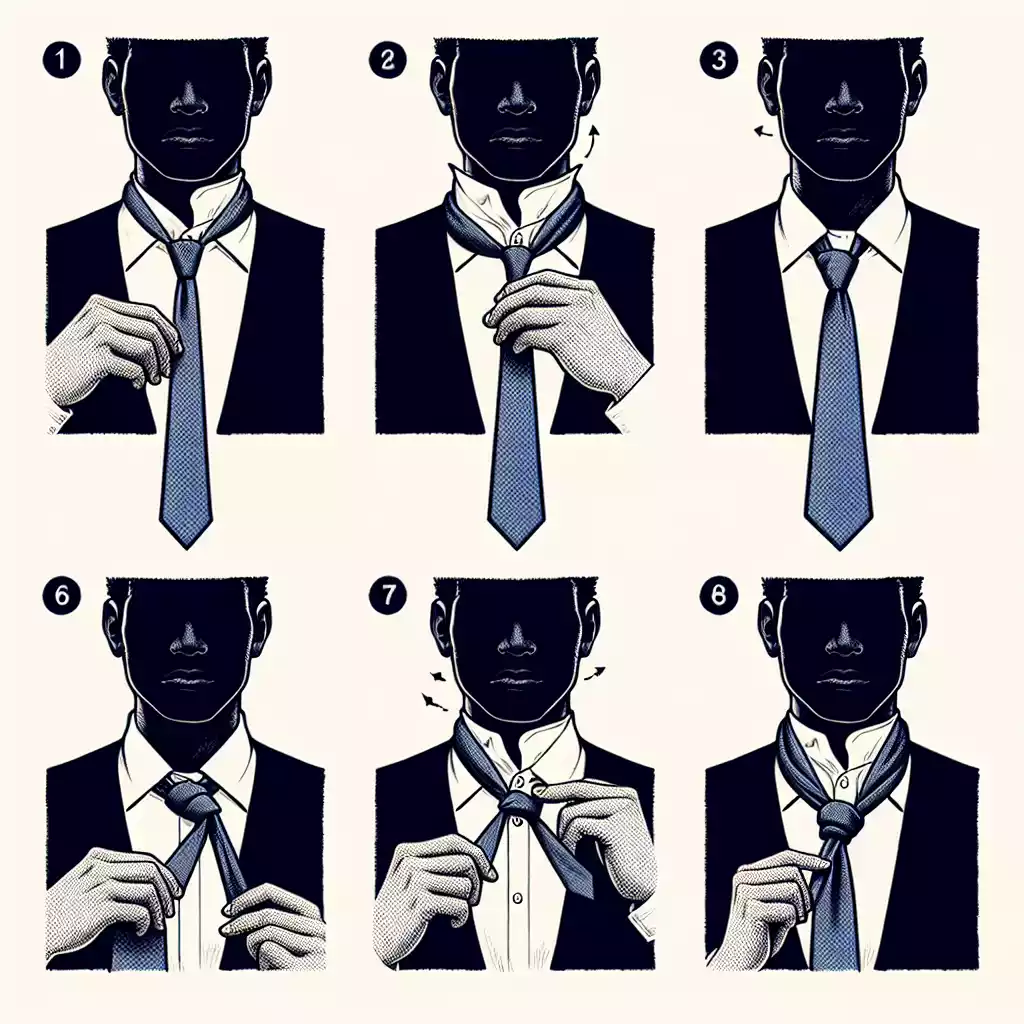
Step-by-Step Instructions for Each Knot

How to Tie the Four-in-Hand Knot
Step 1: Position the Tie
Drape the tie around your neck with the wide end on your right side, extending about 12 inches below the narrow end.
Step 2: Cross the Wide End Over the Narrow End
Bring the wide end across the narrow end, forming an X shape.
Step 3: Bring the Wide End Under and Over Again
Wrap the wide end under the narrow end and bring it over again.
Step 4: Pull Through the Loop and Tighten
Pull the wide end through the loop near your neck and tighten the knot by sliding it up.
How to Tie the Half Windsor Knot
Step 1: Position the Tie
Drape the tie around your neck with the wide end on your right side, extending about 12 inches below the narrow end.
Step 2: Cross the Wide End Over the Narrow End
Bring the wide end across the narrow end, forming an X shape.
Step 3: Bring the Wide End Up Through the Loop
Pull the wide end up through the loop between your neck and the tie.
Step 4: Wrap Around and Pull Through the Loop
Wrap the wide end around the narrow end and pull it through the loop again.
Step 5: Tighten and Adjust
Tighten the knot by sliding it up and adjust it to sit neatly against your collar.
How to Tie the Full Windsor Knot
Step 1: Position the Tie
Drape the tie around your neck with the wide end on your right side, extending about 12 inches below the narrow end.
Step 2: Cross the Wide End Over the Narrow End
Bring the wide end across the narrow end, forming an X shape.
Step 3: Bring the Wide End Up Through the Loop
Pull the wide end up through the loop between your neck and the tie.
Step 4: Wrap Around the Back and Through the Loop Again
Wrap the wide end around the back of the narrow end and pull it through the loop again.
Step 5: Wrap Around the Front and Pull Through
Wrap the wide end around the front of the narrow end and pull it through the loop one last time.
Step 6: Tighten and Adjust
Tighten the knot by sliding it up and adjust it to sit neatly against your collar.
How to Tie the Pratt Knot
Step 1: Position the Tie
Drape the tie around your neck with the wide end on your right side, extending about 12 inches below the narrow end, but start with the tie inside out.
Step 2: Cross the Wide End Under the Narrow End
Bring the wide end under the narrow end, forming an X shape.
Step 3: Bring the Wide End Up Through the Loop
Pull the wide end up through the loop between your neck and the tie.
Step 4: Wrap Around and Pull Through the Loop
Wrap the wide end around the narrow end and pull it through the loop again.
Step 5: Tighten and Adjust
Tighten the knot by sliding it up and adjust it to sit neatly against your collar.
Tips for Perfecting Your Knot
Choosing the Right Knot for the Occasion
Selecting the right knot depends on the occasion and your outfit. The Four-in-Hand is versatile, while the Full Windsor is perfect for formal events.
Common Mistakes to Avoid
• Using a tie that is too short or too long.
• Not tightening the knot properly.
• Choosing the wrong knot for your collar type.
Maintaining Your Tie

Proper Storage Techniques
• Hang your ties on a tie rack to prevent wrinkles.
• Avoid leaving ties knotted when not in use.
Cleaning and Care Tips
• Spot clean with a damp cloth for minor stains.
• Use a professional dry cleaner for tougher stains.
Variations and Styles
Skinny Ties vs. Wide Ties
Skinny ties are trendy and modern, while wide ties offer a classic look. Choose based on your outfit and the occasion.
Patterned Ties vs. Solid Ties
Patterned ties can add a pop of personality, while solid ties are versatile and professional. Mix and match to suit your style.
Conclusion
Mastering the art of tying a tie can elevate your style and boost your confidence. From the simple Four-in-Hand to the sophisticated Full Windsor, each knot offers a unique flair. Practice makes perfect, so keep experimenting until you find the knot that suits you best.
Relevant Data Table
| Type of Knot | Occasion | Difficulty Level |
|---|---|---|
| Four-in-Hand | Casual, Business | Easy |
| Half Windsor | Business, Semi-Formal | Medium |
| Full Windsor | Formal, Business | Hard |
| Pratt Knot | Business, Casual | Medium |
FAQs
FAQ 1: How do I choose the right tie for my outfit?
Choosing the right tie involves considering the color, pattern, and width. Match the tie with your shirt and suit for a cohesive look.
FAQ 2: How tight should my tie knot be?
Your tie knot should be snug but not too tight. It should sit comfortably against your collar without causing discomfort.
FAQ 3: How do I avoid wrinkles in my tie?
To avoid wrinkles, hang your tie on a tie rack and avoid leaving it knotted when not in use.
FAQ 4: Can I wash my tie in a washing machine?
It’s best to avoid washing ties in a machine. Spot clean with a damp cloth or take it to a professional dry cleaner.
FAQ 5: What is the most professional tie knot?
The Full Windsor Knot is considered the most professional due to its symmetrical and polished appearance.